Mesh Toolkit v1.0#
What does it do#
Enhanced or automated mesh operations and powerful layout tools.
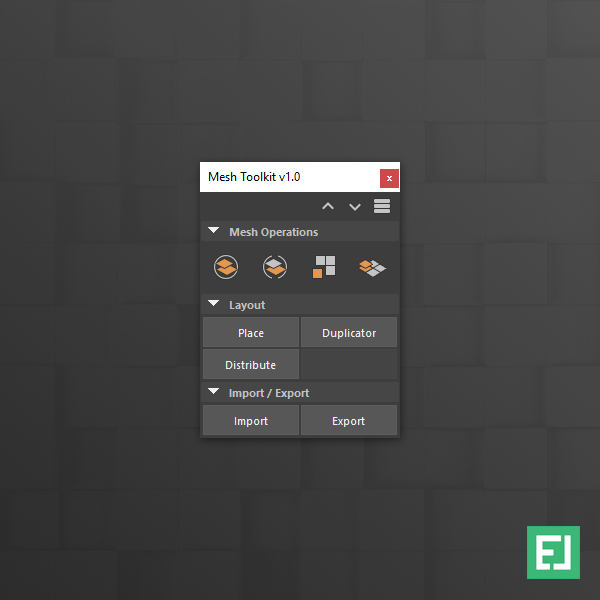
Interface#
Compatibility#
| Maya | 2017 | 2018 | 2019 | 2020 |
|---|---|---|---|---|
| ✓ | ✓ | ✓ | ✓ |
Installation#
-
Copy MeshToolkit.py to :
-
Launch / Restart Maya
-
In Maya, open a Python Tab in the Script Editor and execute :
Warning
Please make sure that there are no Space characters in front of the code lines.
Option Menus / Help Line#
-
Option Menus can be accessed when you click on a button with the RMB 3.
Note
When a button features an Option Menu a little list icon appears next to the cursor.

-
The Help Line, along the bottom left of the Maya user interface, provides a short description of tools and menu items as you hover over them.
Tool Menu#
Info
The Tool menu is located in the top right corner of the toolkit.
-
Up arrow closes all tabs
-
Down arrow opens all tabs
-
Stack icon opens a new window with information about the tool
Mesh Operations#
Combine#
Info
Enhanced combine operation:
-
Clean history (no empty groups)
-
Unique name (EL_Combined#)
-
Option to keep the name of the first selected object (See RMB 3 Option Menu)
-
Stays under current parent
-
Option to keep the orientation of the first selected object (See RMB 3 Option Menu)
-
When you combine one group, it keeps the group name
-
Select 2 or more objects / groups
-
Click on
 to run the script
Note
LMB 1 : Run script
RMB 3 : Option Menu
Option Menu options:
-
Keep Orientation
-
Keep Name (First Object)
Separate#
Info
Enhanced separate operation:
-
Clean history (no empty or top groups)
-
Keeps mesh name and adds a _Sep_# suffix
-
Stays under current parent
-
Centers pivots
-
Select 1 or more combined objects
-
Click on
 to run the script
Extract#
Info
Enhanced extract operation:
-
Clean history (no empty or top groups)
-
Keeps mesh name and adds a _Ext_# suffix
-
Stays under current parent
-
Centers pivot

-
Select 1 or multiple faces
-
Click on
 to run the script
Duplicate Face#
Info
Enhanced duplicate face operation:
-
Separate object with clean history (no empty or top groups)
-
Keeps mesh name and adds a _Dup_# suffix
-
Stays under current parent
-
Centers pivot

-
Select 1 or multiple faces
-
Click on
 to run the script
Layout#
Place#
Info
Place source meshes on a target mesh, right under the mouse cursor location.
Orients the source to the targets normal orientation.
Tip
Check your source objects Y-axis orientation and set the desired pivot location before you start.
-
First select your target object
-
Then Shift select your source object
-
Click Place to run the script
-
Click once or multiple times on your target object to place the source
Duplicator#
Info
Distribute object duplicates based on a value or their bounding box.
Option to define a spacing between the duplicates.
-
Select one or multiple objects.
-
Define your duplicator values within the MMB 2 menu.
-
Set your options in the Option Menu.
-
Click Duplicator to run the script
Note
LMB 1 : Run script
MMB 2 : Duplicator value options
RMB 3 : Option Menu
Option Menu options:
Axis
-
X
-
Y
-
Z
Direction
-
Manipulator (objects only)
-
Positive
-
Negative
Move by
-
Bounding Box
-
Value
Distribute#
Info
Distribute overlapping objects based on their bounding box.
Option to add spacing between the objects.
-
Select multiple overlapping objects.
-
Define your distribute values within the MMB 2 menu.
-
Set your options in the Option Menu.
-
Click Distribute to run the script
Note
LMB 1 : Run script
MMB 2 : Distribute value options
RMB 3 : Option Menu
Option Menu options:
Axis
-
X
-
Y
-
Z
Direction
-
Positive
-
Negative
Import / Export#
Import#
Info
Import OBJ files as a single combined mesh, separated meshes or as Blendshapes.
-
Choose your prefered import option from the RMB 3 Option Menu
-
If you choose As blendshapes select your base mesh
-
Click on Import to run the script
-
Navigate to your file location and select the files you want to import
Known issue with Maya 2017
When you choose As blendshapes it only works, when the base mesh already has a 'BlendShape' node assigned.
Note
LMB 1 : Run script
RMB 3 : Option Menu
Option Menu options:
Options
-
Combined
-
Separate files
-
As blendshapes
Export#
Info
Export objects as OBJ files. Either as a single combined or separate files.
It is also possible to export an objects Blendshapes as separate files.
-
Select 1 or multiple objects
-
Choose your prefered export option from the RMB 3 Option Menu
-
Click on Export to run the script
-
Specify a save location
Note
LMB 1 : Run script
RMB 3 : Option Menu
Option Menu options:
Options
-
Combined
-
Separate files
-
Blendshapes