Shader Toolkit v1.2#
What does it do#
The Shader Toolkit is a compact management replacement for the 'Hypershade' interface and offers useful shortcuts and utilities to fix common shading issues.
Interface#
Compatibility#
| Maya | 2017 | 2018 | 2019 | 2020 |
|---|---|---|---|---|
| ✓ | ✓ | ✓ | ✓ |
Installation#
-
Copy ShaderToolkit.py to :
-
Launch / Restart Maya
-
In Maya, open a Python Tab in the Script Editor and execute :
Warning
Please make sure that there are no Space characters in front of the code lines.
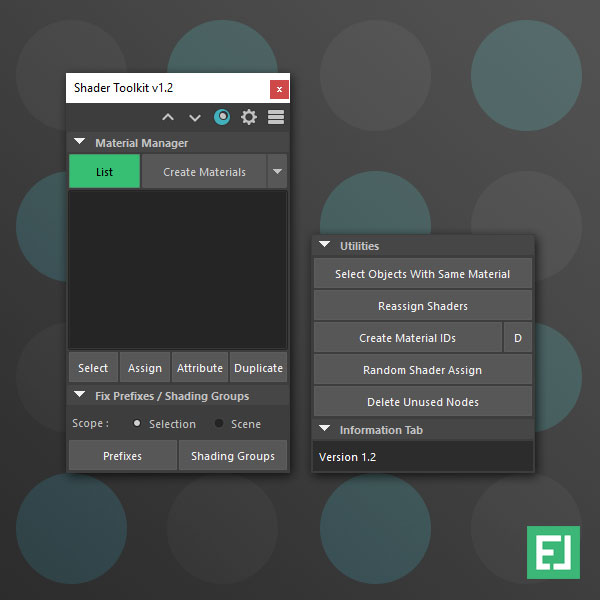
Tool Menu#
Info
The Tool menu is located in the top right corner of the toolkit.
-
Up arrow closes all tabs
-
Down arrow opens all tabs
-
Hypershade icon opens the Hypershade editor
-
Gear icon, opens the Create Menu Options
-
Stack icon opens a new window with information about the tool
Material Manager#
Info
Compact Shader management replacement for the Hypershade editor.
-
List will list all shaders that are currently in the scene and sorts them alphabetically.
Buttons:
-
Select: Selects all geometry objects, that have the selected list item assigned.
-
Assign: Assigns the selected list item to the selected object(s).
-
Attributes: Choose a list item and click the button to open the shader attributes.
-
Duplicate: Duplicates the selected list item(s).
Keyboard key strokes:
-
Remove: Use the Delete button on your keyboard to remove the selected list item(s). It automatically assigns the default shader to the affected objects.
Note
You can't delete the lambert1 shader.
-
Rename: Double click a list item to rename a shader.
-
-
Create Materials lets you create new shaders from a drop-down menu.
- Available shaders depend on the installed render engines.
Supported Render Engines#
-
Maya (Default)
-
Arnold
-
Redshift
Note
The tool automatically detects the available render engines.
Create Menu#
Open the Create Materials settings from the Tool Menu by clicking on the Gear icon.
-
Clear unselects all available shader options.
-
Reset reselects all available shader options.
-
Set confirms your selection and updates the Create Materials drop-down menu.
Note
At least one shader needs to be checked.
-
Now the Create Materials menu will only include the choosen shader.
Fix Prefixes / Shading Groups#
First choose the Scope of the operation:
-
Selection (Only affects the current material selection)
-
Scene (Affects all materials within the scene)
Prefixes#
Automatically removes pasted__ or exported__ material name prefixes.
Shading Groups#
Automatically corrects Shading Group names.
Utilities#
Select Objects With Same Material#
-
Select one object and execute the function
-
It selects all objects, that have the same material assigned
Reassign Shaders#
Automatically reassigns all shaders to fix accidental assignments to polygon faces.
Create Material IDs#
Creates 9 surface shader, each with a unique color.
Info
The colors are: Blue, Cyan, Green, Magenta, Orange, Purple, Red, Turquoise, Yellow
Great to create mask IDs.
- Use the D button to delete all Material IDs at once.
Random Shader Assign#
Assigns the selected list materials randomly to the current object selection.
Delete Unused Nodes#
Deletes all shading nodes that are not assigned to surfaces.
Information Tab#
Provides extra information for each function about how many objects or shaders have been affected.
Footnotes#
-
LMB - Left Mouse Button ↩